Tuesday, December 12, 2017

Interactive Grid: How to Fix Blank Toolbar DIV

One of the best functionalities of the Interactive Grid is declarative master-detail option. That's the reason why I like to use them also in readonly mode. Most of the time I don't need toolbar in detail regions so I turn it off (Region Attributes > Toolbar > Show = No).

But, currently (in APEX 5.1.4.00.04 and less) there's little bug that I can't ignore. It's 9px blank div above report headers:


At first I thought that's easy - I'll just use :empty CSS pseudo selector and hide DIV element with CSS class .a-IG-header:
.a-IG-header:empty{
  display:none
}
But that breaks sticky headers when you scroll down. To fix that I had to use different CSS:
.a-IG-header:empty{
  padding:0;
  border-bottom:0
}
If you want to use other regions for master-detail pages take a look at my plugin on apex.world.

Demo is available here.

Tested on apex.oracle.com (v5.1.4.00.04).

Enjoy!

Wednesday, November 29, 2017

Pimp Your Forms - Post/Pre Text Icons

I saw this at the presentation from Patrick Wolf (I believe somewhere in 2016.). You may already know this but today it took me some time to remember how it works.

There's an easy way to make your forms look nicer by using declarative option to display pre/post item property values as a part of an item (Display as Block). You can display icons, text or links there.


How To

To enable this, go to the Template Options of the item and set property Item Pre/Post Text to Display as Block:


After that, put the following HTML code in Pre/Post Text item property (in this case it displays Euro currency icon):


You can use any of the icons from Font APEX library there.


Note

In version 5.1.3.00.5 there's a CSS bug with icon alignment. You can fix this by adding following CSS (preferable to global CSS file or Theme Roller):

.t-Form-itemText .fa {
  vertical-align:middle;
  top:-1px;
}

Demo is available here.

Enjoy!

Friday, August 4, 2017

How to debug/trace APEX session

In most cases you don't have access to production environment and reproducing of a production bug can be a real problem.

If you don't use logger (which I strongly recommend) or you don't have a feedback page you can always use APEX's native debugging tool.

There's a easy way to use native APEX debug and you can turn it on:
  • with 5th URL parameter that can be set to YES or to some value between LEVEL0 to LEVEL9 (there's no LEVEL3 and LEVEL7). YES equals LEVEL4 (more on debug levels here and here). You can use this only for applications that have debugging property turned on (under application properties). 
  • programatically with apex_debug package.
But on production environment you probably want to track a specific user session. To turn it on for specific user session you can use apex_session package (new from APEX 5.1).

To find out what session you want to track you can ask your end user to read you a third parameter in URL (don't do that 🙂) right after application and page id or you can track it yourself by querying APEX dictionary view apex_wokspace_sessions:
select *
  from apex_workspace_sessions 
 where workspace_name = &WORKSPACE_NAME 
   and user_name = &USERNAME;
After that you can call apex_session.set_debug to turn on debugging for this specific user session:

begin 
  apex_session.set_debug(p_session_id => &SESSION, p_level => 4); 
  commit; 
end;
/
Other solution is to use APEX builder (if you have access). To turn it on in APEX builder go to the Monitor Activity > Active Sessions find the session and change session attribute Debug Level


Then you can ask your end user to try to reproduce an application bug and after that you can query apex_debug_messages dictionary view to check for errors or you can use APEX Builder to do the same (Application > Utilities > Debug Messages).

You can use same package (apex_session) to turn on SQL tracing (procedure set_trace). Tracing can be turned on also with URL parameter

Enjoy!

Tested on APEX 5.1.2.00.09

Wednesday, June 7, 2017

Auto hide client-side messages

Probably somebody did a blog post about it but I haven't found it yet.

The Problem

If you didn't modify your Universal theme, by default, success and validation messages appear in the top right corner of a page and you have to close them manually or they disappear when you refresh/submit your page.

It can be confusing when you are on a page with Interactive Grid and you change something repeatedly and successfully - it seems like nothing happened. So let's see how to hide them...

The Solution

It can be done by using theme hooks under apex.message namespace.

How To

If you want that all your client-side messages are hidden after 3 seconds you should call this code:
apex.message.setThemeHooks({
  beforeShow: function(pMsgType, pElement$){
    setTimeout(function() {
      $('.t-Body-alert .t-Alert').fadeOut('slow');
    }, 3000);  
  }
});
Where the second parameter in setTimeout function (with value 3000) is a number of milliseconds. In my case, it's 3 seconds.

If you want to hide only success or error/validation messages you can use pMsgType variable. For example:

apex.message.setThemeHooks({
  beforeShow: function(pMsgType, pElement$){
    if (pMsgType==apex.message.TYPE.SUCCESS){ 
   setTimeout(function() {
        $('.t-Body-alert .t-Alert').fadeOut('slow');
      }, 3000);
    }   
  }
});
For error/validation messages pMsgType parameter equals error.

To apply this code for all pages in application put this in Page Load dynamic action on the global page (page 0) or in your custom JS file (preferred).

The demo is available here.

Enjoy!

Tested on APEX 5.1.1.00.08

Friday, April 28, 2017

How to make any table header sticky

The Problem

If you're using Interactive Reports and Grids in your apps you may know that there's a property Fixed To that fixes the report's column headers to the top of the page or region so that the column headers remain visible as the user vertically scrolls the report. But there's no such option for Classic report regions or your custom HTML tables.

The Solution

You can easily do it by using two JS widgets that are build into APEX - Sticky Table Header and Sticky Widget.

How To 

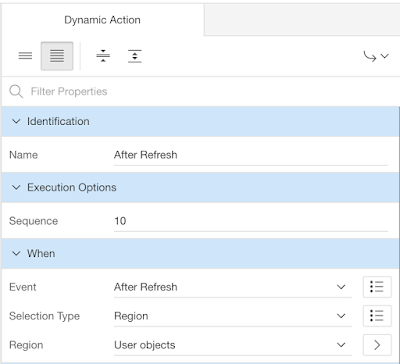
To add it to the Classic report region you have to create After Refresh dynamic action that fires after refresh of your Classic report region:


and define true action that executes the following JavaScript code:

var vRegion$ = $(this.triggeringElement);
vRegion$.setTableHeadersAsFixed();
vRegion$.find('.js-stickyTableHeader').stickyWidget();
Dynamic action should look like this:


Remember to set property Fire on Initialization to Yes.

For the additional options you can check out the file libraries/apex/widget.stickyWidget.js in APEX installation folder or through page source view when you're running your application in debug mode.

For custom HTML tables you can use the same principle and if your custom HTML table is not rendering dynamically fire the JS code above only on page load.

The demo is avaliable here.

Tested on APEX 5.1.1.00.08

Enjoy!

Update on November 14,  2018.
Following example doesn't work in some versions of APEX (like 18.*). To fix it add a reference to the JS Widget in page property JavaScript File URLs or globally (theme or User Interface Attributes):

#IMAGE_PREFIX#libraries/apex/#MIN_DIRECTORY#widget.stickyTableHeader#MIN#.js?v=#APEX_VERSION#
Thanks for the fix goes to Alan Arentsen.

Thursday, April 6, 2017

Auto format number items in APEX

One of the questions that I get constantly is how to make a number format masks live - to format number fields as you type or when you leave an item.

In APEX you can define a number format masks in property Format Mask of number fields:


But it's only affected on page load and after page submit for validating format. There's nothing that prevents end user to enter a string or a number in wrong format.


There's a great JS library for that - autoNumeric.js. So let's see how can you implement it in your apps.

1) Download autoNumeric.js from GitHub (this demo works with autoNumeric library version v2.0.13).

2) Unzip the file and upload autoNumeric.min.js (from dist folder) to your workspace (or application) files (Shared Components > Static Workspace/Application Files) or to your server file location.


3) Add reference to the file in your application. I usually do it under the Shared Components > User Interface Attributes > Desktop > JavaScript File URLs


Now you can use it in your APEX apps. To use it for all APEX number type items you can create onLoad dynamic action on the global page (in most apps this is page 0). Number type items have CSS class number_field so you can initialize AutoNumeric on it, for example:


To explicitly override defaults from the global page you can create onLoad dynamic action on the specific page (remember to put greater sequence id from the one on the page 0) and use the update method to change the default properties:


For other methods and properties see autoNumeric.js documentation.

You can see demo here.

Edit (Thanks to Jorge Rimblas): You don't have to hardcode group and decimal separators, you can get them with apex.locale.getGroupSeparator() and apex.locale.getDecimalSeparator().

Enjoy!

Tested on APEX 5.1.1.00.08


Friday, March 17, 2017

APEX 5.1 Master detail (with Interactive/Classic Detail Report)

You probably know that in APEX 5.1 you can easily make a master-detail report regions declaratively by using an Interactive Grids (IG).

But what if you don't want all those fancy IG stuff (I know, I know...you can hide/disable all of it) but plain old Classic (or Interactive) Report for a detail report. No problem, it's only few clicks away!

Let's take a well known example with the dept and emp tables.

First of all you have to create an Interactive Grid over the dept table (master):


Don't forget to put the DEPTNO into SQL Query. It can be hidden, but you have to put it in.

Next step is to create a hidden item (with Value Protected property set to No) where you will temporary store the DEPTNO of the selected grid row (in my case it's P28_DEPTNO):


Then you can create your detail report (Classic or Interactive) over the emp table with where condition that references your hidden item (don't forget to put it in Page Items to Submit):


Next step is to create a dynamic action with event Selection Change [Interactive Grid] over the dept region:


For first true action use Set Value with the Set Type Javascript Expression and define it as:

this.data.selectedRecords.length != 1 ? '': this.data.model.getValue( this.data.selectedRecords[0], "DEPTNO")
and for an Affected element choose your hidden item:


The second true action should be a refresh of your detail region...and thats all.

Live demo is available here.

You can use similar approach if you want this to work with a multiple selected rows (for example in editable grid) but then you should change Set Value DA and where condition of your emp query to support this.

Enjoy!

Tested on APEX 5.1.0.00.45

Friday, March 3, 2017

APEX 5.1 quick fix: Closing modal page before confirm/alert dialog

When I have to do some things repeatedly it’s good indication that I should share this in a blog post. This time it's quick one and I’m sure that it will be fixed by Shakeeb in next the APEX (Universal theme) version.

There’s a problem in APEX 5.1.0.00.45 UT when you call confirm/alert dialog with apex.message JS API from modal page. The problem is that you can close modal page before closing confirm/alert dialog.

You can fix this by adding this CSS block to your custom CSS files or to Theme Roller’s Custom CSS property:
body .ui-front ~ .ui-front{
  z-index:902     
}
Demo is available here.


Enjoy!

Friday, February 24, 2017

How to create simple local web server for APEX static files

Today I've run into a problem that happens to me quite often. I've started a new project at the new client and one of the first things that I've had to do is to modify Universal Theme to meet their corporate design. They had simple APEX architecture with the EPG and without any custom CSS or JS in their apps.

At first, I thought that I would have to do some minor changes in CSS so I've started to use Custom CSS property in Theme Roller. It's great tool, but as I had to do more and more changes it was just too slow.

So I've asked them to provide me with some Web repository where I can easily put and change my files. Because this is a quite big company (actually a bank) with very strict security policies I knew that this would take a too looooong time. So I've started to look for an alternative.

Off course, my first thought was a great tool named APEX Front End Boost (if you don't know it, check it out), but again, because strict security policies, I wasn't been able to install it on the PC that I was working on. The good thing was that I had Node.js already installed there.

So I've googled around for other solutions, but almost every solution was starting like this:
npm install ...
and it was a bummer because I couldn't install anything from npm.

So I've decided to build my own solution. I thought, I'm not a Node.js developer but I know JavaScript so it shouldn't be too hard...and it wasn't.

I've found one simple server script and added some additional stuff like Access-Control-Allow-Origin and Content-Type headers:
var fs = require('fs');  
var path = require('path');  
var http = require('http');
var staticBasePath = '.';

var staticServe = function(req, res) {  
    var fileLoc = path.resolve(staticBasePath);
    fileLoc = path.join(fileLoc, req.url);

    fs.readFile(fileLoc, function(err, data) {
        if (err) {
            res.writeHead(404, 'Not Found');
            res.write('404: File Not Found!');
            return res.end();
        }
  
  var vExt = req.url.split('.').pop(), vContType;
  switch(vExt) {
   case 'css':
    vContType = 'text/css';
    break;
   case 'js':
    vContType = 'text/javascript';
    break;
   case 'png':
    vContType = 'image/png';
    break;    
   default:
    vContType = 'text/plain';
  } 

  res.setHeader('Content-Type', vContType);
  // Chrome Fix
  res.setHeader('Access-Control-Allow-Origin', '*');
        res.statusCode = 200;
        res.write(data);
        return res.end();
    });
};

var httpServer = http.createServer(staticServe);

httpServer.listen(8085); 
...started it:
node node_server.js
..and voila! I had my static file server running on localhost:8085 (change the port number if you already have something running on 8085) and I could access files through URL like this http://localhost:8085/custom_theme/custom.css (where custom_theme is directory where node_server.js is located).

The next goal was that other developers don't have any problems with the application runtime while I'm doing my CSS changes. So at first, I've created one application item F_THEME_PATH


and application computation (after authentication) to populate it in developement environment (with build option included for developement only)


and the other application computation to populate it on production and test environments which always returns path to workspace images (also defined by build option):

return '&WORKSPACE_IMAGES.custom_theme/';

The idea is - if I'm logged in take files from my local server and for other users take files from APEX workspace files. On test and production evnironments always take files from APEX workspace files.

Because there's a great feature to upload zip file with directory structure to APEX workspace files it was really easy to refresh new version of my files when I was sattisfied with my modifications.  

The last thing was to add reference to my files. You can do this in several places in APEX. I've decided to do it in user interface properties:


Enjoy!

Tested on APEX 5.1.0.00.45 and Node 5.2.0

Tuesday, February 7, 2017

APEX 5.1: Translate HTML5 Client-Side Validation Messages

You may know that in APEX 5.1 there are some new functionalities regarding client-side messaging - for example, the capability to display success or error messages without a full page reload or new JS API for handling client-side messages. There are also enabled HTML5 Form Validations, so you may saw something like this in your apps:


The problem that I had is that the user wanted to translate those messages to the other language (in my case Croatian). I thought - no problem. I'll find those messages in the APEX messages dictionary and translate them to the Croatian. After some exploring I found out that those messages are actually browser depended and you can't translate them (the only option is to install browser in different language).

Fortunately, the APEX development team has thought about this and you can override those messages by defining custom attribute named data-valid-message under the item's Custom Attributes property:


And now the form should look like this:


If you don't want to do this for each and every item in your app you can create On Load Dynamic Action on Global Page (page 0) that looks like this:


which will add this attribute to all required fields.

You can read more about the data-valid-message attribute in apex.item documentation.

Enjoy!

Tested on APEX 5.1.0.00.45